Supplies
1 tube of choice - I’m using the artwork of Zindy S.D. Nielsen here.
Font of Choice - Burton’s Nightmare here
Eyecandy 5: Impact - Gradient Glow
Eyecandy 5: Nature - Fire
Animation Shop
“Yarrow/Grunge & Glitter” is a PTU tagger size scrap kit created by Brandi of Grunge and Glitter Scraps and can be purchased at her store Digital Chaos Scraps. You can visit both of her blogs here and here.
Thank you Brandi for this stunning kit!
The richness of it is awesome!
This tutorial was written assuming you have working knowledge of PSP.
~♥~ Let’s get started ~♥~
Unless otherwise stated, we’ll be working out of the kit
“Forbidden Love GG”
Open up a transparent image
700 x 700
Select All.
Copy and paste Paper 5 Into Selection.
Deselect.
Copy and paste Fold Paper 3 as a new layer.
Resize 90% and move to the left side of your canvas.
See mine for reference.
Copy and paste Doodle 2 as a new layer.
Free rotate Right 90 degrees
Resize 80%
Position over the Fold Paper.
Copy and paste Frame 2 as a new layer.
Resize 50%.
Click inside with your Magic Wand.
Selections/Modify/Expand by 7
New Raster layer below the frame.
Copy and paste a paper of choice Into Selection.
Copy and paste your tube below the frame.
Selections/Invert.
Tap the delete key.
Deselect.
Merge visible the frame, tube, and paper.
Free rotate left 15 degrees and move toward the upper left portion of your canvas.
See mine for reference.
Add your embellishments. I used:
Flower Branch 2
Flower Branch 3: Resize 50%
Feather 2: 70%
Feather 3: 80%
Pillow 2: Resize 50%
Doodle 3: Resize 40%
Candelabra: Resize 50%
Open up Forbidden Love Yarrow kit
Bow 4: Resize 40%
Rose Stem: Resize 50%
Butterfly 3 & 4: Resize 40%
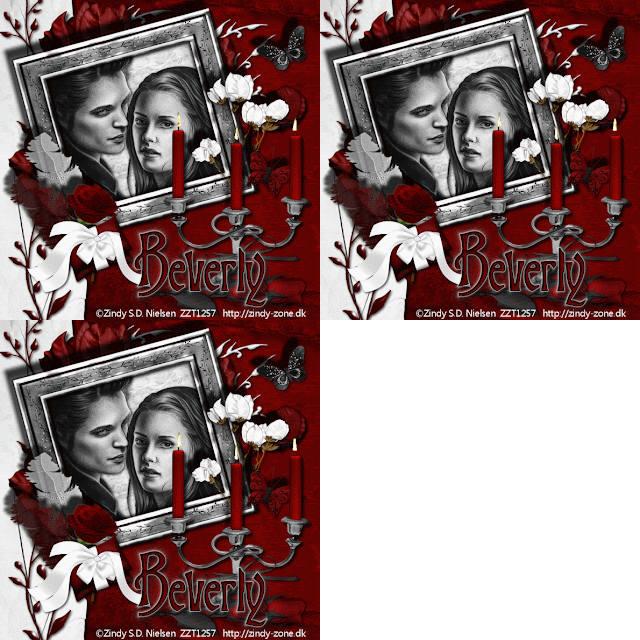
Highlight the Candelabra layer.
Duplicate twice for a total of three layers.
Rename them Candelabra 1, 2, and 3.
Highlight Candelabra 1.
Use your Selection Tool and make an outline of a flame above ach of the candles. It doesn’t have to be perfect!!
Apply Eyecandy 5: Nature - Fire

Highlight Candelabra 2.
Apply the same Fire effect accept hit the Random Seed Button once.
Highlight Candelabra 3.
Apply the same Fire effect accept hit the Random Seed Button once.
Close out Candelabra layers 2 & 3.
Add your copyrights.
Add your name.
I used Eyecandy 5 - Impact - Gradient Glow
This tutorial was written assuming you have working knowledge of PSP.
~♥~ Let’s get started ~♥~
Unless otherwise stated, we’ll be working out of the kit
“Forbidden Love GG”
Open up a transparent image
700 x 700
Select All.
Copy and paste Paper 5 Into Selection.
Deselect.
Copy and paste Fold Paper 3 as a new layer.
Resize 90% and move to the left side of your canvas.
See mine for reference.
Copy and paste Doodle 2 as a new layer.
Free rotate Right 90 degrees
Resize 80%
Position over the Fold Paper.
Copy and paste Frame 2 as a new layer.
Resize 50%.
Click inside with your Magic Wand.
Selections/Modify/Expand by 7
New Raster layer below the frame.
Copy and paste a paper of choice Into Selection.
Copy and paste your tube below the frame.
Selections/Invert.
Tap the delete key.
Deselect.
Merge visible the frame, tube, and paper.
Free rotate left 15 degrees and move toward the upper left portion of your canvas.
See mine for reference.
Add your embellishments. I used:
Flower Branch 2
Flower Branch 3: Resize 50%
Feather 2: 70%
Feather 3: 80%
Pillow 2: Resize 50%
Doodle 3: Resize 40%
Candelabra: Resize 50%
Open up Forbidden Love Yarrow kit
Bow 4: Resize 40%
Rose Stem: Resize 50%
Butterfly 3 & 4: Resize 40%
Highlight the Candelabra layer.
Duplicate twice for a total of three layers.
Rename them Candelabra 1, 2, and 3.
Highlight Candelabra 1.
Use your Selection Tool and make an outline of a flame above ach of the candles. It doesn’t have to be perfect!!
Apply Eyecandy 5: Nature - Fire
Highlight Candelabra 2.
Apply the same Fire effect accept hit the Random Seed Button once.
Highlight Candelabra 3.
Apply the same Fire effect accept hit the Random Seed Button once.
Close out Candelabra layers 2 & 3.
Add your copyrights.
Add your name.
I used Eyecandy 5 - Impact - Gradient Glow
Time to animate:
Copy Merge and carry into Animation Shop.
Edit/Paste/As New Animation.
Go back into PSP.
Close out Candelabra 1 and open Candelabra 2.
Copy Merge and carry into AS.
Edit/Paste/After Current Frame
Go back into PSP.
Close out Candelabra 2 and open Candelabra 3.
Copy Merge and carry into AS.
Edit/Paste/After Current Frame
Animation/Frame Properties
Change the Display time to 18
View your animation.
If you’re happy with it then save.
I hope you enjoyed this tutorial.
I’d love to see your results and show it off in my Show Arena.
Email me!
Hugs,
Bev


No comments:
Post a Comment