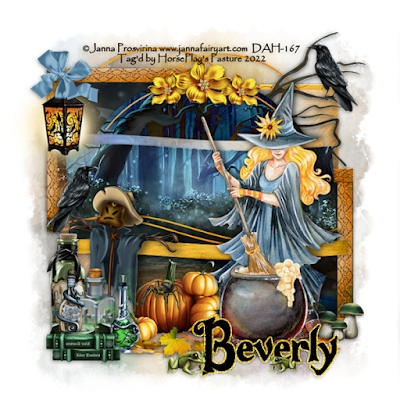
Supplies Needed
1 tube of choice – I used the awesome artwork of
Janna Prosvirina which can be purchased from Digital Art Heaven here
Font of choice – I used HalloWitchZ here
Becky Mask here
My Template 215 here
Plug-Ins used:
Brush Strokes – Sprayed Strokes
Snaggables available here
“Witches Brew” is an Exclusive PTU Tagger Size scrap kit
designed by Moonshine Dezinez and can be purchased from Digital Art Heaven here.
This tutorial was written assuming you have a working knowledge of PSP.
~♥~ Let’s get started ~♥~
Open up the template.
Shift + D.
Close out the original.
Image/Canvas Size:
700 x 700
OK
Highlight the background layer.
Flood fill white.
Delete template layers 8 and 12.
Highlight Template Layer 1.
Select All/Float/Defloat
New Raster layer.
Copy and paste Paper 3 Into Selection.
Deselect.
Delete the template layer.
Repeat the above step with:
Template Layers 2, 3, 4, 14, and 18
Highlight Template Layer 5.
Select All/Float/Defloat
Copy and paste Paper 6 as a new layer just
above the template layer.
Right Click on the paper in your layers pallet
and choose “Promote Section to Layer” from the sub menu.
Deselect.
Delete the template layer.
Move the Original paper just above Template
Layer 9 and repeat the above step.
Highlight Template Layer 6.
Select All/Float/Defloat
New Raster Layer above the template layer.
Copy and paste Paper 9 Into Selection.
Apply Brush Strokes – Sprayed Strokes:
Stroke Length: 16
Spray Radius: 19
OK
Deselect.
Delete the template layer.
Repeat the above step with Template Layer 10.
Highlight Template Layer 7.
Select All/Float/Defloat
New Raster Layer.
Copy and paste Paper 4 Into Selection.
New Raster Layer.
Copy and paste Paper 3 Into Selection and
change the Blend Mode to Luminance.
New Raster layer.
Copy and paste Frame 2 Into Selection
Deselect.
Delete the template layer.
Repeat the above steps with Template Layer 11.
Highlight Template Layer 13.
Select All/Float/Defloat
Copy and paste Paper 4 Into Selection.
Copy and paste Paper 2 as a new layer and move into a position you like.
Right click on it in your layers pallet and
choose “Promote Section to Layer”
Change the Blend Mode to “Difference”.
Delete the original paper layer.
Deselect.
Delete the template layer.
Highlight Template Layer 15.
Select All/Float/Defloat
New Raster Layer
Copy and paste Paper 9 Into Selection.
Deselect.
Delete the template layer.
Highlight Template Layer 16.
Select All/Float/Defloat
Copy and paste Paper 2 as a new layer.
Resize 50%
Move into a position you like.
Right Click on it in your layers pallet and
choose “Promote Section to Layer” from the sub menu.
Deselect.
Delete the template layer.
Delete the original paper layer.
Highlight Template Layer 17.
Select All/Float/Defloat
New Raster Layer.
Copy and paste Paper 6 Into Selection.
Deselect.
Delete the template layer.
Copy and paste your tube as a new layer and
move into position – see my tag for reference.
If you’re using the tube as I did, I used the
Witch Only layer and Resize 60%
Add your elements. I used: (see tag for placement reference)
El 55:
Resize 50%
El 45:
Resize 15%/Duplicate/Mirror
El 16:
Resize 15%/Duplicate/Resize 70%/Duplicate
El 14: Resize 25%
El 17:
Resize 15%
El 33: Resize 35%
El 5:
Resize 10%
El 11:
Resize 15%
El 12:
Resize 25%
El 37:
Resize 15%
El 25:
Resize 60%
El 38:
Resize 20%
El 38:
Resize 20%
El 10:
Resize 70%
El 7:
Resize 25%/Duplicate/Mirror/Resize 70%
Add your copyrights.
Close out the white background layer and the two little frogs – (you’ll use
those to decorate your name)
Merge Visible all layers.
Duplicate and move below the merged layer.
Adjust/Blur/Gaussian Blur:
Radius: 15
OK
Image/Resize:
115%
Be sure “Resize all layers” is NOT clicked.
OK
Reopen the white canvas layer.
Apply the mask to the blurred layer.
Merge Group.
Add your name.
Color Pallet:
Foreground and Background: #000000
Set the stroke to 1.0
Type your name.
Convert
to Raster Layer.
Select All/Float/Defloat
Selections/Modify/Expand by 2.
OK
Flood fill with #ebc934
Adjust/Add Remove Noise/Add Noise:
Gaussian and Monochrome checked
Noise: 60%
OK
Deselect.
Highlight the black name layer.
Merge Down.
Use the frogs to place at each end of your name – see my tag for reference.
I hope you enjoyed this
tutorial.
I’d love to see your results.
Email me!
Hugs,
Bev


No comments:
Post a Comment