Supplies Needed
1 tube of choice – I used
the beautiful artwork of Amberly Berendson which can be purchased from Digital Art Heaven.
My mask 27 here
My template 217 here
PlugIns used:
Mura’s Meister – Copies
DSB Flux- Bright Noise
“The Harvest” is a wonderful
tagger size scrap kit created by Patty of Honored Scraps and can be purchased from
TKO here. You can visit her blog here.
This tutorial was written
assuming you have a working knowledge of PSP.
~♥~ Let’s
get started ~♥~
Open up the template.
Shift + D.
Close out the original.
Delete the credit layer.
Highlight the background
layer.
Image/Canvas Size
700 x 700
OK
Flood fill white.
Highlight Template Layer
1.
Click on it with your
Magic Wand.
New Raster layer.
Copy and paste Frame 5
Into Selection.
Deselect.
Delete the template
layer.
Highlight Template Layer
2.
Repeat the above step.
Highlight Template Layer
3.
Click on it with your
Magic Wand.
New Raster layer.
Copy and paste Paper 4
Into Selection.
New Raster layer.
Copy and paste Paper 5
Into Selection and change the Properties of this layer to Color (Legacy)
Deselect.
Delete the template
layer.
To each paper layer give
it a slight Inner Bevel:
Highlight Template Layer
4.
Repeat the above steps.
Highlight Template Layer 5.
Highlight Template Layer 5.
Click on it with your
Magic Wand.
New Raster layer.
Copy and paste Paper 4
Into Selection.
Deselect.
Delete the template
layer.
Give the paper the same
slight Inner Bevel.
Highlight Template Layer
6.
Repeat the above step.
Highlight Template Layer
7.
Click on it with your Magic
Wand.
New Raster layer.
Copy and paste Paper 5
Into Selection.
Deselect.
Delete the template
layer.
Give the paper the same
slight Inner Bevel.
Highlight Template Layer
8.
Repeat the above step.
Highlight Template Layer
9.
Click on it with your Magic Wand.
Click on it with your Magic Wand.
New Raster Layer.
Copy and paste Paper 6
Into Selection.
Deselect.
Delete the template
layer.
Give the paper the same slight
Inner Bevel.
Highlight Template Layer
10.
Repeat the above step.
Highlight Template Layer
11.
Click on it with your
Magic Wand.
New Raster layer.
Copy and paste Paper 6
Into Selection.
Deselect.
Delete the template
layer.
Give the paper the same slight
Inner Bevel.
Highlight Template Layer
12.
Repeat the above step.
Highlight Template Layer
13.
Click on it with your
Magic Wand.
New Raster layer.
Copy and paste your tube
as a new layer.
Resize as you like.
Move it into a position
you like.
Selections/Invert.
Use your Eraser Tool to
erase the area of the tube you don’t want to overhang the edge of the
paper. If you’re using the same tube as
I did, I chose to keep a few pieces of hay sticking over the edge.
Paste your tube again and
move below the other tube layer.
Resize as you like but
keep it bigger than the other tube layer.
Change the Properties of
this tube layer to Overlay.
Once you have it in exact
position tap the delete key.
Deselect.
Delete the template
layer.
Highlight Template Layer
14.
Select All/Float/Defloat.
New Raster layer.
Flood fill with #d9b875.
Deselect.
Give the layer a slight
Inner Bevel:
Apply DSB Flux – Bright Noise:
Intensity: 50
Check Mix
OK
Deselect.
Delete the template
layer.
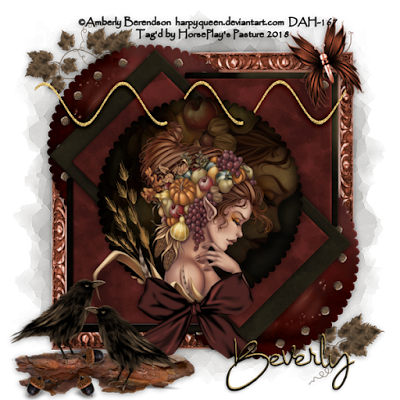
Copy and paste Element 39
as a new layer.
Resize 10%
Move this element to the
top right corner of the rust colored paper – see my tag for reference.
Duplicate the element and
move to the center of the canvas (doesn’t have to be exactly in the middle)
Apply Mura’s Meister –
Copies:
Choose: Encircle.
Chance the top 3 numbers
to:
Number: 25
Shift X: 45
Shift Y: 45
OK
Duplicate the circle and
move each into position – see my tag for reference.
Copy and paste Element 5
as a new layer.
Resize 50%
Duplicate
Move each of these
elements over the same circles but below the circle of dots.
Add your
elements. I used:
El 17: Resize 40%/Free rotate Left 20 degrees
El 37: Duplicate
El 14: Resize 70%
El 10: Resize 45%
El 24: Resize
50%/Duplicate/Mirror
Open up element 41. Use your Selection Tool set on Point to Point
and section out the center acorn.
Copy
Paste as a new layer and
duplicate, duplicate and mirror as you like.
Highlight your white
background.
New Raster layer.
Select All.
Copy and paste Paper 6
Into Selection.
Deselect.
Apply the mask.
Merge Group.
Duplicate and change the
Properties of this mask layer to Multiply.
Add your copyrights.
Add your name.
Color Pallet:
Foreground and Background:
##090906
Type your name.
Convert to Raster Layer.
Color Pallet:
Foreground: #c4a359
Background: #ffdf94
Type your name.
Convert to Raster layer.
Move below the dark
colored name layer in your layers pallet.
Move the lighter colored
name layer slightly to the right and up – see my tag for reference.
Merge Visible both name
layers.
Close out your white
background.
Save your tag as a PNG.
I hope you enjoyed this
tutorial.
I’d love to see your
results.
Hugs,
Bev


No comments:
Post a Comment