

Supplies
1 tube of choice - I used the wonderful artwork of Lollipop Labs which can be purchased from PSP Stop. You must have a license to use.
Font of choice - I used Parseltongue here
Plug Ins used:
Brush Strokes - Sprayed Strokes
Eyecandy 5: Texture - Stone Wall and Swirl
"The Perfect Scream" is a FTU tagger size scrap kit created by myself. You can download it from my designing blog here...scroll to the bottom and it'll be under Thursday, October 6, 2011.
This tutorial assumes you have a working knowledge of PSP.
~♥~ Let's get started ~♥~
Open up a blank 590 x 250 canvas.
Flood fill with #808080
Apply Eyecandy 5: Texture - Swirl:
Settings Tab:
Solid, Small Loops
Basic Tab:

OK
Apply Brush Strokes - Sprayed Strokes:

OK
Color Pallet:
Foreground: Null
Background: #000000
Make your Rectangle Tool active.
Create a rectangle approximately 240 x 250 pixels.
Objects/Align/Center in Canvas.
Convert to Raster layer.
Click on the rectangle with your Magic Wand.
Selections/Modify/Contract by 5.
New Raster layer.
Flood fill with #000000
Deselect.
Copy and paste your tube as a new layer.
Position it over the white rectangle.
Copy and paste Element 17 as a new layer.
Resize 60%
Free rotate Left 90 degrees
Move into position behind the black rectangle on the left side near the top - see my tag for reference.
Duplicate
Mirror
Merge Down.
Duplicate
Flip
Copy and paste Element 11 as a new layer above your tube layer.
Resize 80% and move into position - see my tag for reference.
Duplicate
Mirror
Move below the black rectangle in your layers pallet.
Image/Add Borders:
Symmetric checked
Color: #000000
Top, Left, Right, Bottom: 4
OK
Image/Add Borders:
Change the color to #ffffff
Symmetric checked
Top, Left, Right, Bottom: 8
OK
Click on the white border with your Magic Wand.
Apply Eyecandy 5: Texture - Stone Wall:
Basic Tab:

OK
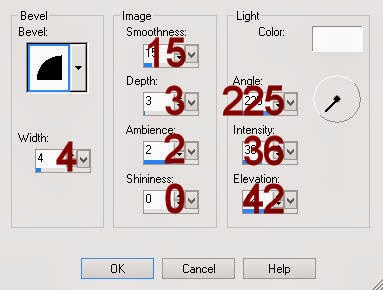
Give it a slight Inner Bevel:
Deselect.
Image/Add Borders:
Symmetric checked
Color: #000000
Top, Left, Right, Bottom: 2
OK
Copy and paste Element 13 as a new layer.
Resize 40%
See my tag for placement.
Copy and paste Element 1 as a new layer.
Resize 35%
See my tag for placement.
Copy and paste Element 40 as a new layer.
Resize 60%
Move into position in the lower right corner.
Duplicate - move to the upper left corner.
Add your name -
Color Pallet:
Foreground: #000000
Background: #af7432
Stroke: .80
Type your name.
Give it the same slight Inner Bevel.
Decorate with the spider from kit.
Save as a jpeg.
I hope you enjoyed this tutorial as much as I did creating it.
Would love to see your results...email me!
Hugs,
Bev
Thank you for the tutorial! Here is a set for you.
ReplyDeletehttp://images19.fotki.com/v207/photos/4/1469214/12531221/Bev_AMFrightNightavi-vi.jpg
http://images62.fotki.com/v1452/photos/4/1469214/12531221/Bev_AMFrightNightTag-vi.jpg
Oh wow, Cindi, thank you so much!! What an awesome set!!! I have them safely saved ♥♥
ReplyDeleteYou are welcome :)
ReplyDelete