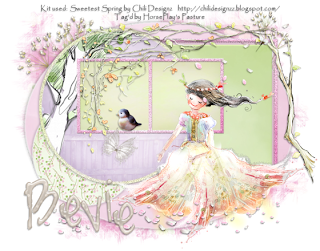
Supplies
Weescotlass Mask 297 here
Divine Intentionz Template 386 here
Eyecandy 3.1 - Glow
“Sweetest Spring ” is a tagger size scrap kit created by Chili Designz and can be purchased from Stargazer Scraps. You can visit her blog here. Thank you Chili for a super sweet kit!
This tutorial was written assuming you have a working knowledge of PSP.
~♥~ Let’s get started ~♥~
Open up the template.
Shift + D.
Close out the original.
Image/Canvas Size:
700 x 550
OK
Open up the background layer.
Flood fill white.
Delete the top 4 layers.
Highlight Oval layer.
Click on it with your Magic Wand.
New Raster layer.
Copy and paste Paper 4 Into Selection.
Deselect.
Delete the template layer.
Apply Eyecandy 3.1 - Glow:
Width: 3
Opacity: 100
Opacity Drop off: Fat
Color: White
OK
Highlight Circle 2 layer.
Click on it with your Magic Wand.
New Raster layer.
Copy and paste Paper 6 Into Selection.
Duplicate/Change the Properties to Multiply.
Merge Down.
Deselect.
Delete the template layer.
Apply the same Glow effect.
Highlight Rectangle layer.
Click on it with your Magic Wand.
New Raster layer.
Copy and paste Paper 9 Into Selection.
Deselect.
Delete the template layer.
Give it a slight Inner Bevel:
Highlight Frame layer.
Click on it with your Magic Wand.
New Raster layer.
Copy and paste Paper 7 Into Selection.
Deselect.
Delete the template layer.
Give it the same slight Inner Bevel.
Adjust/Add Remove Noise/Add Noise:
Uniform and Gaussian checked.
Noise: 33%
OK
Repeat the above step with the other Frame template layer.
Highlight Dotted Rec layer.
Select All/Float/Defloat
New Raster layer.
Paste Paper 7 Into Selection.
Duplicate
Merge down.
Deselect.
Delete the template layer.
Highlight Circle Back layer.
Select All/Float/Defloat
New Raster layer.
Copy and paste Paper 3 Into Selection.
Deselect.
Delete the template layer.
Give it the same noise effect.
Highlight Circle 1 layer.
Click on it with your Magic Wand.
New Raster layer.
Copy and paste Paper 8 Into Selection.
Copy and paste Fence as a new layer above the circle paper.
Resize 50%
Move into position.
Change the Properties to Overlay.
Selections/Invert
Tap the delete key.
Copy and paste Tree 2 as a new layer.
Resize 70%
Move into position.
Tap the delete key.
Deselect.
Delete the template layer.
Highlight Frame Back layer.
Click on both squares with your Magic Wand.
New Raster layer.
Copy and paste Paper 3 Into Selection.
Deselect.
Delete the template layer.
Add your embellishments. I used:
Tree: Resize 60%/Mirror
Bird: Resize 25%
Girl: resize 80%
Flower 4: Free rotate Left 20 degrees/Erase the bottom part of the stem
Flower 5: Resize 70%/Erase the bottom part of the stem
Deco 2: Resize 70%
Butterfly: Resize 45%/Free rotate Right 30 degrees
Highlight your white canvas.
New Raster layer.
Select All.
Copy and paste 2 Into Selection.
Deselect.
Apply the mask.
Merge Group.
Add your copyrights.
Add your name:
I used the alpha’s that came with the kit.
Capital letters: Resize 50%
Lower case letters: Resize 40%
Resize all layers 80%.
I hope you enjoyed this tutorial.
I’d love to see your results and show it off in my gallery.
Email me!
Hugs,
Bev

No comments:
Post a Comment