

Supplies
1 tube of choice - I used the artwork of Anna Marine which can be purchased from CDO. You must have a license to use.
Font of choice - I used Stonehenge Regular here
Weescotlass Mask 236 here
Plugs Ins:
Mura’s Meister - Wallpaper (perspective)
Greg’s Factory Output Vol. II - Pool Shadow
“Creepy Hollow” is a scrap kit created by Gail of Aussie Scrap Designs and can be purchased from her store Aussie Scrap Designs. You can visit her blog here.
Thank you Gail for a spook-tacular creepy kit!
This tutorial was written assuming you have a working knowledge of PSP.
~♥~ Let’s get started ~♥~
Open up a 700 x 700 blank canvas.
Flood fill white.
Make your Selection tool active set on Circle.
Create a 500 pixel circle - it’s alright if it’s not centered.
New Raster layer.
Flood fill with #000000
Deselect.
Adjust/Add Remove Noise/Add Noise
Uniform and Monochrome checked
Noise: 30%
OK
Effect/Edge Effect/Enhance
Center the circle on your canvas.
Click anywhere outside of it with your Magic Wand.
Selections/Invert
New Raster layer
Copy and paste BG4 Into Selection.
Apply Greg’s Factory Output Vol. II - Pool Shadow:
Use Default settings accept move the Intensity bar to 100.
Deselect.
Copy and paste the following elements onto your canvas above the circle paper. Move them into position - see my tag for reference. Don’t worry about what overhangs the circle - we’ll clean that up in a bit.
Witches House: Resize 70%
Dying Tree
Headstone 2: Resize 25% and 70%
Wrought Iron Fence: Resize 70%
Creepy Grass: Resize 30%
Dead Plant 2: Resize 25%
Batty Moon: Resize 25% and 40%
Cloud 1: Resize 25%/Mirror
Highlight the paper layer.
Click anywhere outside of it with your Magic Wand.
Highlight each element layer and tap the delete key.
Deselect.
Copy and paste Brown Leaf as a new layer.
Resize 25%, 25%, and 70%
Apply Mura’s Meister - Wallpaper (Perspective)
Use Default Settings.
OK
Erase whatever leaves you don’t want on your canvas. I left a trail moving diagonal across the canvas.
Copy and paste your tube as a new layer.
Add your embellishments. I used:
Crow: Resize 30%
Highlight your white canvas.
New Raster layer.
Select All.
Copy and paste BG10 Into Selection.
Deselect.
Adjust/Blur/Gaussian Blur
Radius: 15
OK
Apply the mask.
Resize 105%
Merge Group.
Add your copyrights.
Add your name:
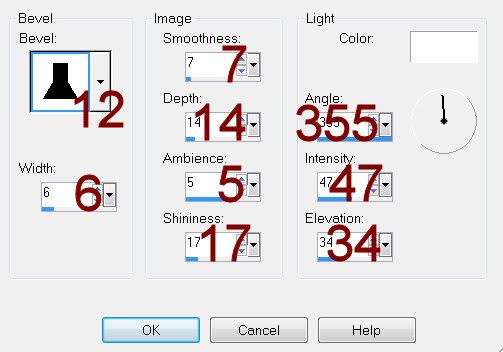
Give it a slight Inner Bevel 2x:
Duplicate the crow and decorate your name with it.
Resize all layers 80%.
I hope you enjoyed this tutorial.
I’d love to see your results and show it off in my gallery.
Email me!
Hugs,
Bev
Resize all layers 80%.
I hope you enjoyed this tutorial.
I’d love to see your results and show it off in my gallery.
Email me!
Hugs,
Bev
No comments:
Post a Comment