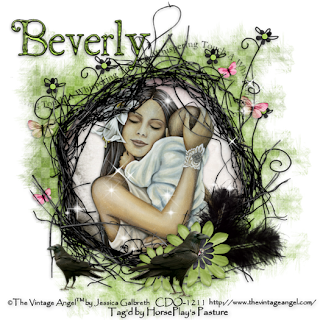
Supplies
1 tube of choice - I used the artwork of The Vintage Angel TM by Jessica Galbreth which can be purchased from CDO. You must have a license to use.
Font of choice - I used St Nicholas here.
Weescotlass Mask 297 here
“A Whispering Touch” is a tagger size scrap kit created by Jessica of Gothic Inspirations. This gorgeous kit is part of a stunning collaboration that is available at Stargazer Scraps. It’s free with a $7.50 purchase or you can buy the collaboration outright for $11.25.
Jessica, thank you so much for your beautiful portion!
This tutorial was written assuming you have a working knowledge of PSP.
~♥~ Let’s get started ~♥~
Open up a 700 x 700 blank canvas.
Flood fill white.
Copy and paste Frame 2 as a new layer.
Resize 65%.
Use your Freehand Selection Tool and outline the frame - keeping the marching ants within the center of the frame width.
New Raster layer below the frame.
Copy and paste Paper 4 Into Selection.
Copy and paste your tube as a new layer below the frame.
Selections/Invert
Tap the delete key.
Deselect.
Close out your white canvas.
Merge Visible.
Reopen your white canvas.
Move the merged layer up just a bit on your canvas.
Add your embellishments. I used:
Feather: Resize 25%/Duplicate/Free rotate Right 65 degrees
Flower 2: Resize 25%/Duplicate/Resize 70%
Crow: Resize 25%/Mirror/Duplicate/Resize 70%/Mirror
Doodle Flower: Resize 65%/Duplicate
Butterflies: Resize 65%/Duplicate/Erase the butterflies you don’t want.
Sparkles
Highlight your white canvas.
New Raster layer.
Select All.
Copy and paste Paper 9 Into Selection.
Deselect.
Apply the mask.
Merge Group.
Copy and paste Word Art 1 as a new layer.
Resize 65%
Move into the position you want to see it over the mask layer.
Apply the mask.
Merge Group.
Add your copyrights.
Add your name.
Give it a slight Inner Bevel:
Foreground: #000000
Background: Pattern/Paper 9
Stroke: 1
Type your name.
Convert to Raster layer.
Select All/Float/Defloat
Selections/Modify/Contract by 1
Give it a slight Inner Bevel:

Deselect.
Resize all layers 80%.
I hope you enjoyed this tutorial.
I’d love to see your results and show it off in my gallery.
Email me!
Hugs,
Bev
1 tube of choice - I used the artwork of The Vintage Angel TM by Jessica Galbreth which can be purchased from CDO. You must have a license to use.
Font of choice - I used St Nicholas here.
Weescotlass Mask 297 here
“A Whispering Touch” is a tagger size scrap kit created by Jessica of Gothic Inspirations. This gorgeous kit is part of a stunning collaboration that is available at Stargazer Scraps. It’s free with a $7.50 purchase or you can buy the collaboration outright for $11.25.
Jessica, thank you so much for your beautiful portion!
This tutorial was written assuming you have a working knowledge of PSP.
~♥~ Let’s get started ~♥~
Open up a 700 x 700 blank canvas.
Flood fill white.
Copy and paste Frame 2 as a new layer.
Resize 65%.
Use your Freehand Selection Tool and outline the frame - keeping the marching ants within the center of the frame width.
New Raster layer below the frame.
Copy and paste Paper 4 Into Selection.
Copy and paste your tube as a new layer below the frame.
Selections/Invert
Tap the delete key.
Deselect.
Close out your white canvas.
Merge Visible.
Reopen your white canvas.
Move the merged layer up just a bit on your canvas.
Add your embellishments. I used:
Feather: Resize 25%/Duplicate/Free rotate Right 65 degrees
Flower 2: Resize 25%/Duplicate/Resize 70%
Crow: Resize 25%/Mirror/Duplicate/Resize 70%/Mirror
Doodle Flower: Resize 65%/Duplicate
Butterflies: Resize 65%/Duplicate/Erase the butterflies you don’t want.
Sparkles
Highlight your white canvas.
New Raster layer.
Select All.
Copy and paste Paper 9 Into Selection.
Deselect.
Apply the mask.
Merge Group.
Copy and paste Word Art 1 as a new layer.
Resize 65%
Move into the position you want to see it over the mask layer.
Apply the mask.
Merge Group.
Add your copyrights.
Add your name.
Give it a slight Inner Bevel:
Foreground: #000000
Background: Pattern/Paper 9
Stroke: 1
Type your name.
Convert to Raster layer.
Select All/Float/Defloat
Selections/Modify/Contract by 1
Give it a slight Inner Bevel:
Deselect.
Resize all layers 80%.
I hope you enjoyed this tutorial.
I’d love to see your results and show it off in my gallery.
Email me!
Hugs,
Bev

No comments:
Post a Comment