Supplies
1 tube of choice - I used the artwork of Anna Marine which can now be purchased from CDO. You must have a license to use.
Font of choice - I used Rat Infested Mailbox here
Creative Misfit - Template 1 by Deb & Tamie.
Can be found under June 15, 2011
Weescotlass Mask 236 here
Greg’s Factory Output Vol. II - Pool Shadow
“Gothic Queen” is tagger size scrap kit created by Sandy of Sandy’s Design and can be purchased from Inspirations of Scrap Friends. You can visit her blog here.
Thank you Sandy for such an incredible kit!
This tutorial was written assuming you have a working knowledge of PSP.
~♥~ Let’s get started ~♥~
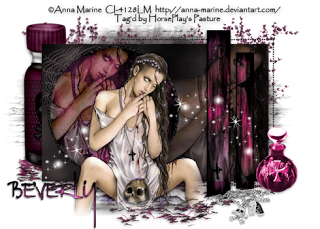
Open up the template.
Shift + D.
Close out the original.
Resize all layers 85%
Image/Canvas Size:
700 x 500
Delete the top 5 layers, Copy of Vector 1, and Raster 4 layer.
Highlight Raster 9.
Select All/Float/Defloat
New Raster layer.
Copy and paste Paper 1 Into Selection.
Adjust/Add Remove Noise/Add Noise:
Monochrome and Gaussian checked
Noise: 66%
OK
Deselect.
Delete the template layer.
Highlight Raster 13.
Repeat the above step.
Highlight Raster 2 layer.
Click on it with your Magic Wand.
New Raster layer.
Copy and paste Paper 12 Into Selection.
Apply Greg’s Factory Output Vol. II - Pool Shadow:
Use Default Settings.
Deselect.
CLOSE OUT the template layer.
Give it a slight Inner Bevel:
Highlight Raster 6 layer..
Click on it with your Magic Wand.
New Raster layer.
Copy and paste Paper 2 Into Selection.
Deselect.
CLOSE OUT the template layer.
Give it the same Inner Bevel.
Highlight Raster 7 layer.
Repeat the above step.
Merge Visible Raster 6 & 7 template layers.
They should now both be on the same layer.
Use your Magic Wand and click on both of them.
Copy and paste your tube as a new layer above the template layer.
Change the Properties of the tube to Overlay.
Move your tube into position - make sure it’s where you’d like to see it not only on the large rectangle but also on the thin vertical slats - It’s the reason I had you use your Magic Wand on the slats…it gives some guidance as to placement.
Once you have your tube in the position you want Deselect.
Highlight Raster 2 template layer.
Click anywhere outside of it with your Magic Wand.
Highlight the tube layer.
Tap the delete key.
Deselect.
Delete the template layer.
Highlight the merged template layer - the vertical slats.
Click on each one with your Magic Wand.
Highlight your tube layer.
Right Click/Promote Section to layer.
Deselect.
Change the Properties of this layer to Saturation.
Copy and paste your tube as a new layer.
Position it where you want it in front of the circle template layer.
Highlight Raster 3 layer.
Click on it with your Magic Wand.
New Raster layer.
Copy and paste Paper 2 Into Selection.
Copy and paste your tube as a new layer over the paper.
Move it into exact position.
Selections/Invert
Tap the delete key.
Deselect.
Delete the template layer.
Change the Properties of this tube to Hard Light and lower the Opacity to about 53.
Add your embellishments. I used:
Ivy 2: Resize 60%/Duplicate/Mirror
Skulpolis1: Resize 70%
Chain 1: Resize 40%
Makeup: Resize 40%
Web: Resize 40%
Ivy 1: Erase top of it
Sparkles 1: 70%
Highlight your white canvas.
Select All
New Raster layer.
Copy and paste Paper 2 Into Selection.
Deselect.
Apply the mask.
Use your Pick Tool and pull the left side out slightly.
Merge Group.
Add your copyrights.
Add your name.
Color Pallet:
Foreground: Black
Background: Pattern/Paper 2
Type your name.
Convert to Raster layer.
Select All/Float/Defloat
Apply the Pool Shadow Effect - same settings.
Apply again.
Deselect.
Resize all layers 80%.
I hope you enjoyed this tutorial.
I’d love to see your results and show it off in my gallery.
Email me!
Hugs,
Bev

No comments:
Post a Comment