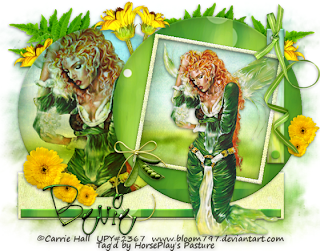
Supplies
1 tube of choice - I used the beautiful artwork of Carrie Hall which you can purchase from Up Your Art. You must have a license to use.
Font of choice - I used Second Lyrics here
Gem Mask 22 here
Divine Intentionz Template 325 here
“Spring’s Serenade ” is a tagger size scrap kit created by Leigh of Heartfelt Perfections and can be purchased from Butterfly Blush Designs. You can visit her blog here. Thank you Leigh for such a wonderful spring kit!
This tutorial was written assuming you have a working knowledge of PSP.
~♥~ Let’s get started ~♥~
Open up a the template.
Shift + D.
Close out the original.
Delete the top 2 layers and Raster 1 layer.
Highlight the background layer and open it up.
Image/Canvas Size:
700 x 550
OK
Flood fill white.
Highlight Rectangle layer.
Click on it with your Magic Wand.
Copy and paste Paper 1 as a new layer.
Move into a position you like
Selections/Invert
Tap the delete key.
Adjust/Add Remove Noise/Add Noise:
Gaussian and Monochrome checked
Noise: 25%
OK
Deselect.
Delete the template layer.
Give it a slight Inner Bevel:
Highlight Thin Rectangle layer.
Click on it with your Magic Wand.
New Raster layer.
Open up SSE 1.
Using your Selection Tool set on rectangle, section out a large portion of the boot.
In your color pallet set the foreground to Pattern and find the boot pattern.
Make your working canvas active.
Flood fill with the boot pattern.
Deselect.
Delete the template layer.
Give it the same slight Inner Bevel.
Highlight Tiny Circle 1 template layer.
Merge down.
Both tiny circle template layers should be on the same layer.
Click on both circles with your Magic Wand.
New Raster layer.
Flood fill with your pattern.
Deselect.
Delete the template layer.
Give it the same Inner Bevel.
Highlight Circle 2 template layer.
Click on it with your Magic Wand.
New Raster layer.
Flood fill with your pattern.
Deselect.
Delete the template layer.
Give it the same slight Inner Bevel.
Highlight Small Rectangle 1 layer.
Click on it with your Magic Wand.
New Raster layer.
Copy and paste Paper 2 Into Selection.
Deselect.
Delete the template layer.
Give it the same slight Inner Bevel.
Highlight Circle 1 layer.
Click on it with your Magic Wand.
New Raster layer.
Copy and paste Paper 9 Into Selection.
Copy and paste your tube as a new layer above the circle paper layer.
Resize much larger.
Selections/Invert
Tap the delete key.
Deselect.
Delete the template layer.
Change the Properties of the tube layer to Multiply.
Give the Circle paper layer the same slight Inner Bevel.
Highlight Frame Background layer.
Click on it with your Magic Wand.
New Raster layer.
Copy and paste Paper 2 Into Selection.
Deselect.
Delete the template layer.
Highlight Frame 1 as a new layer.
Click on it with your Magic Wand.
Copy and paste Paper 1 as a new layer.
Resize 60%
Selections/Invert
Tap the delete key.
Deselect.
Delete the template layer.
Give it the same slight Inner Bevel.
Give it the same noise effect.
Copy and paste your tube as a new layer.
Position in front of the frame.
Add your embellishments. I used:
15: Resize 30%
20: Resize 40%/Flip/Duplicate/Mirror/Duplicate. Duplicate Original/Resize 70%
2: Duplicate/Mirror. Duplicate Original/Resize 70%
16: Resize 30%
21: Resize 70%/Duplicate/Resize 70%Duplicate/Resize 70%. Duplicate and mirror the flowers of your choice.
Highlight your white canvas.
New Raster layer.
Select All.
Copy and paste Paper 9 Into Selection.
Deselect.
Apply the mask.
Merge Group.
Duplicate/Change the Properties to Multiply.
Use your Pick Tool on each layer to pull the sides out slight.
Add your copyrights.
Add your name:
Give it a slight Inner Bevel:
Resize all layers 80%.
I hope you enjoyed this tutorial.
I’d love to see your results and show it off in my gallery.
Email me!
Hugs,
Bev

No comments:
Post a Comment