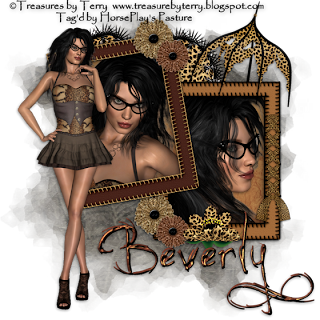
Clicking on the image will allow you to enlarge for bigger view.
Supplies
1 tube of choice and 2 close ups - I used the beautiful artwork of Terry which is a freebie she has offered and can be downloaded from her blog here. Please leave a thank you when downloading. It’s a small gesture for hard work given freely.
Font of Choice - I used Jellyka Castle’s Queen here
My mask 19 here
“Color Me Wild” is a PTU scrap kit created by Terry of Treasures by Terry and can be purchased from Butterfly Blush Designs. You can visit her blog here.
Thank you Terry for yet another spectacular kit! Love this one!!
This tutorial was written assuming you have a working knowledge of PSP.
~♥~ Let’s get started ~♥~
Open up a 700 x 700 blank canvas.
Flood fill white.
Copy and paste Frame 7 as a new layer.
Resize 80%
Free rotate left 10 degrees.
Click inside of it with your Magic Wand.
Selections/Modify/Expand by 6.
Copy and paste Paper 10 Into Selection.
Copy and paste a close up image of your choice as a new layer.
Resize as you like.
Selections/Invert
Tap the delete key.
Deselect.
Close out your white canvas.
Merge Visible.
Close this merged layer out and open up your white canvas.
Copy and paste Frame 9 as a new layer.
Resize 80%
Click inside of it with your Magic Wand.
Selections/Modify/Expand by 6.
Copy and paste Paper 10 Into Selection.
Copy and paste a close up image of your choice as a new layer.
Resize as you like.
Selections/Invert
Tap the delete key.
Deselect.
Close out your white background.
Merge Visible.
Reopen all layers.
Move both merged layers into position - see my tag for reference.
Copy and paste your tube as a new layer.
Add your embellishments. I used:
Heart 5
Umbrella 3: Mirror/Free rotate Right 10 degrees
Laced 2: Resize 40%/Free rotate Left 10 degrees
Laced 1: Resize 40%
Flower 2: Resize 30%
Flower 3: Resize 25%
Flower 5: Resize 50%
Highlight your white background.
New Raster layer.
Select All.
Copy and paste Paper 8 Into Selection.
Deselect.
Apply the Mask.
Merge Group.
Add your credits.
Add your name.
Give it a slight Inner Bevel:

Resize all layers 80%.
I hope you enjoyed this tutorial.
I’d love to see your results and show it off in my gallery.
Email me!
Hugs,
Bev
Supplies
1 tube of choice and 2 close ups - I used the beautiful artwork of Terry which is a freebie she has offered and can be downloaded from her blog here. Please leave a thank you when downloading. It’s a small gesture for hard work given freely.
Font of Choice - I used Jellyka Castle’s Queen here
My mask 19 here
“Color Me Wild” is a PTU scrap kit created by Terry of Treasures by Terry and can be purchased from Butterfly Blush Designs. You can visit her blog here.
Thank you Terry for yet another spectacular kit! Love this one!!
This tutorial was written assuming you have a working knowledge of PSP.
~♥~ Let’s get started ~♥~
Open up a 700 x 700 blank canvas.
Flood fill white.
Copy and paste Frame 7 as a new layer.
Resize 80%
Free rotate left 10 degrees.
Click inside of it with your Magic Wand.
Selections/Modify/Expand by 6.
Copy and paste Paper 10 Into Selection.
Copy and paste a close up image of your choice as a new layer.
Resize as you like.
Selections/Invert
Tap the delete key.
Deselect.
Close out your white canvas.
Merge Visible.
Close this merged layer out and open up your white canvas.
Copy and paste Frame 9 as a new layer.
Resize 80%
Click inside of it with your Magic Wand.
Selections/Modify/Expand by 6.
Copy and paste Paper 10 Into Selection.
Copy and paste a close up image of your choice as a new layer.
Resize as you like.
Selections/Invert
Tap the delete key.
Deselect.
Close out your white background.
Merge Visible.
Reopen all layers.
Move both merged layers into position - see my tag for reference.
Copy and paste your tube as a new layer.
Add your embellishments. I used:
Heart 5
Umbrella 3: Mirror/Free rotate Right 10 degrees
Laced 2: Resize 40%/Free rotate Left 10 degrees
Laced 1: Resize 40%
Flower 2: Resize 30%
Flower 3: Resize 25%
Flower 5: Resize 50%
Highlight your white background.
New Raster layer.
Select All.
Copy and paste Paper 8 Into Selection.
Deselect.
Apply the Mask.
Merge Group.
Add your credits.
Add your name.
Give it a slight Inner Bevel:
Resize all layers 80%.
I hope you enjoyed this tutorial.
I’d love to see your results and show it off in my gallery.
Email me!
Hugs,
Bev

No comments:
Post a Comment