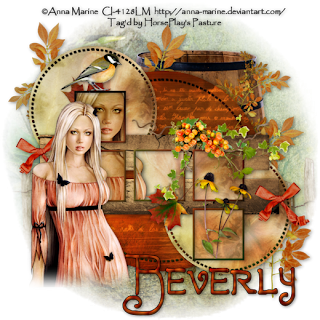
Clicking on the image will allow you to enlarge for bigger view.
Supplies
1 tube of choice - I’m using the artwork of Anna Marine at CILM
Font of Choice - I’m using Fortunaschwein here
Monti Circular Mask here
Denz Designz Template 158 here
“Forever Fall” is a PTU tagger size scrap kit created by Jessica of Gothic Inspirations and can be purchased at her store Gothic Inspirations. You can visit her blog here.
This tutorial was written assuming you have a working knowledge of PSP.
~♥~ Let’s get started ~♥~
Open up the template.
Shift +D.
Close out the original.
Delete the top credit layer and Girlz Girlz Girlz layer.
Image/Canvas Size
650 X 650
Highlight DDD layer and flood fill white.
Highlight Black Circle layer.
Click on it with your Magic Wand.
New Raster layer.
Copy and paste Paper 5 Into Selection.
Deselect.
Delete the template layer.
Highlight White Dotted Lines layer.
Select All/Float/Defloat
New Raster layer.
Copy and paste Paper 8 Into Selection.
Deselect.
Delete the template layer.
Highlight Bottom Dotted Circle layer.
Merge Down.
Both dotted circle layers should be on one layer now.
Repeat the above step.
Highlight Top Pink Circle layer.
Click on it with your Magic Wand.
New Raster layer.
Copy and paste Paper 2 Into Selection.
Deselect.
Delete the template layer.
Highlight Bottom Pink Circle layer.
Repeat the above step.
Highlight 2 Gray Strips layer.
Click on them with your Magic Wand.
New Raster layer.
Copy and paste Paper 1 Into Selection.
Deselect.
Delete the template layer.
Give it a slight inner bevel:
INSERT PIC HERE
Highlight 4 Frames Back layer.
Click on each square with your Magic Wand.
New Rater layer.
Copy and paste Paper 2 Into Selection.
Deselect.
Delete the template layer.
Highlight 4 Frames layer.
Select All/Float/Defloat
New Raster layer.
Copy and paste Paper 8 Into Selection.
Deselect.
Delete the template layer.
Copy and paste your tube as a new layer.
Paste your tube again and keep it larger than the other.
Move it below the frames - see my tag for reference.
Highlight the paper frame backs layer.
Click anywhere outside of them with your Magic Wand.
Highlight the tube layer that’s below the frames.
Tap the delete key.
Deselect.
Change the Properties to Multiply
Duplicate
Change the Properties to Soft Light.
Add your embellishments. I used:
Bird: Resize 25%
Barrel: Resize 60%
Leaves
Golden Grapes: Resize 50%
Bow 2: Resize 25% and 90%
Cornflower: Resize 40%
Leaf 1: Resize 25%
Leaf 2: Resize 25% and 90%
Highlight your white background.
New Raster layer.
Select All.
Copy and paste Paper 10 Into Selection.
Copy and paste Fence as a new layer above the paper.
Move it down slightly on your canvas so the bottom of the fence is even with the bottom of the circle.
Merge Down.
Apply the mask.
Merge Group.
Duplicate.
Add your copyrights.
Add your name.
Convert to Raster layer.
Select All/Float/Defloat
Selections/Modify/Contract by 1
Give it a slight inner bevel:
I hope you enjoyed this tutorial.
I’d love to see your results and show it off in my gallery.
Email me!
Hugs,
Bev

Gorgeous tutorial Bev.
ReplyDeleteThank you LexiPup :O)
ReplyDeletewhich circular mask did you use again? The link is bad. I really love the tutorial. I'm very new to this and these tutorials are so very helpful. Thanks.
ReplyDeletelisabalazs@msn.com