Supplies
Font of choice - I used Arctic 2 here
Dezigns by Ali Template 17 here
Weescotlass Mask 84 here
“Cute Cat” is a FTU full size scrap kit created by Jaelop Designs and can be found here.
Please leave a simple thank you when downloading. It’s a small gesture for hard work given freely.
This tutorial was written assuming you have a working knowledge of PSP.
~♥~ Let’s get started ~♥~
Open up the template.
Shift + D.
Close out the original.
Delete the credit layer words layer.
Resize all layers 85%
Image/Canvas Size
700 x 600
New Raster Layer
Send to bottom
Flood fill white.
Shift + D.
Close out the original.
Delete the credit layer words layer.
Resize all layers 85%
Image/Canvas Size
700 x 600
New Raster Layer
Send to bottom
Flood fill white.
Highlight Large Heart layer.
Select All/Float/Defloat
New Raster layer.
Copy and paste a paper of choice Into Selection.
Deselect.
Delete the template layer.
Select All/Float/Defloat
New Raster layer.
Copy and paste a paper of choice Into Selection.
Deselect.
Delete the template layer.
Give it an inner bevel:
Highlight Small Heart layer.
Select All/Float/Defloat
New Raster layer.
Copy and paste a paper of choice Into Selection.
Deselect.
Delete the template layer.
Give it the same inner bevel.
Highlight Rectangle Frame layer.
Select All/Float/Defloat
New Raster layer.
Copy and paste a paper of choice Into Selection.
Deselect.
Delete the template layer.
Give it an inner bevel:

Select All/Float/Defloat
New Raster layer.
Copy and paste a paper of choice Into Selection.
Deselect.
Delete the template layer.
Give it an inner bevel:
Highlight Rectangle Frame Back layer.
Select All/Float/Defloat
Copy and paste your tube as a new layer.
Selections/Invert
Tap the delete key.
Deselect.
Highlight Wordart layer.
Select All/Float/Defloat
New Raster Layer.
Copy and paste a paper of choice Into Selection.
Deselect.
Delete the template layer.
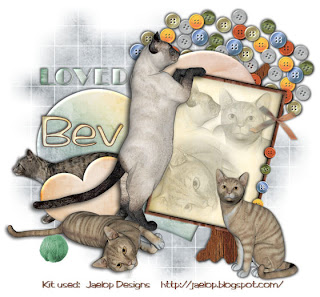
Now we’re going to give the cat elements a feathered look before moving them beneath the frame in the layers pallet.
Copy and paste Element 4 as a new layer.
Resize 35%
Using your Freehand Selection tool, make a circle around the cat’s head. (The circle does not have to be neat!!)
Selections/Modify/Feather
Number of Pixels:
53
OK
Selections/Invert
Tap the delete key until you have a nice feathered look.
Move it beneath the frame and into position.
If any overhangs the frame don’t worry - we’ll take care of that later.
Repeat the above step with Elements 3 and 5 -
Resizing both to 40%
Once you’ve feathered the cats, merge visible the 3 elements.
Change the Properties to Lumanance Legacy.
Highlight the Frame Back.
Select All/Float/Defloat
Selections/Invert
Highlight the merged cat layer
Tap the delete key.
Deselect.
The edges of the frame should have a nice clean look now.
Highlight the Word Art layer.
Select All/Float/Defloat
New Raster layer.
Copy and paste a paper of choice Into Selection.
Deselect.
Delete the template layer.
Give it the same inner bevel you used for the hearts.
Add your embellishments. I used:
Elements 18, 19, 20, & 21: Resize 25% and 50%
Element 39: Resize 25% and 40%
Element 40: Resize 25% and 50% Free rotate Right 10 degrees
Element 8: Resize 30%
Element 6: Resize 25%
Element 3: Resize 25%
Element 5: Resize 35%
Element 4: Resize 25%
Highlight your white background.
New Raster layer.
Select All.
Copy and paste a paper of choice Into Selection.
Deselect.
Apply the mask.
Resize 110%
Merge Group.
Add your copyrights.
If you only used the elements of the kit please place credit for the designer on your tag.
Add your name.
Resize all layers 80%.
I hope you enjoyed this tutorial.
I’d love to see your results.
Email me!
Hugs,
Bev


No comments:
Post a Comment