Sunday, January 26, 2014

Love at First Sight

Supplies

1 tube of choice - I used the wonderful artwork of Mitzi Sato-Wiuff which can be purchased from PSP Tube Stop.  Because this kit was created just for this tube you can get a great package deal (tube and kit) at a great price!  You must have a license to use.

Font of choice - I used Dinosaur Jr. here

Trese Mask 29 here

Plug Ins used:
Mura's Meister - Copies

"Love at First Sight" is a tagger size scrap kit created by me (HorsePlay's Pasture Designs) and can be purchased at any of my stores here

This tutorial assumes you have a working knowledge of PSP.

~♥~ Let's get started ~♥~

Open up a 700 x 700 blank canvas.
Flood fill white.

Copy and paste El 11 as a new layer.
Resize 75%
Use your Magic Wand and click inside of it.
Selections/Modify/Expand by 2.
New Raster layer below the frame.
Copy and paste Paper 14 Into Selection.
New Raster layer.
Copy and paste Paper 10 Into Selection and change the Properties to Hue
Deselect.

Close out your white background.
Merge Visible.
Reopen your white background.

Copy and paste EL80 as a new layer.
Resize 85%
Move this element and the merged layer into their exact positions - see my tag for reference.
Highlight the heart element.
Click inside of it with your Magic Wand.
Selections/Modify/Expand by 2.
New Raster layer below the frame.
Copy and paste Paper 10 Into Selection.
Deselect for now.

Add the following elements below the heart frame.  Don't worry about what overhangs the frame.  We'll clean that up in a bit.
EL75
EL46
El 47
El71:  Resize 25%
El 67:  Resize 50%/Duplicate/Mirror/Resize 70%/Duplicate/Mirror/Resize 70%

After all elements are moved into position - 
Highlight the paper layer.
Click anywhere outside of it with your Magic Wand.
Highlight each element that overhangs the frame and tap the delete key.
Deselect.

Copy and paste your tube as a new layer. See my tag for placement.
If you're using the same tube as I did, Resize 80%

Copy and paste El45 as a new layer.
Resize 10%
Apply Mura's Meister - Copies:
Choose Encircle
Change the Top 3 numbers to:
Number: 25
Shift X: 35
Shift Y: 35
OK
Duplicate the bead ring and move both of them into position - see my tag for reference.

Add the rest of your elements.  I used:
El 65:  Mirror
El 32:  Resize 40%/Duplicate
El 31:  Resize 35%/Duplicate 2x's
El 14:  REsize 50%
El 52;  Resize 40%
El 17:  REsize 40%
El 2:  Resize 30%/Mirror
El 1:  Resize 25%
El 58:  Resize 45%/Duplicate/Free rotate Right 20 degrees.

Crop your image leaving an even amount of room on the top and bottom.

Highlight your blank canvas.
New Raster layer.
Select All.
Copy and paste Paper 19 Into Selection.
Deselect.
Apply the mask.
Merge Group.

Add your copyrights.

Add your name:
Color Pallet:
Foreground: #403b2b
Background: #c39466
Make your text tool active and set the stroke to 0.8

Type your name but leave each letter of it on its own layer.
Choose a couple of the letters and resize them 80%
To each letter apply a slight Inner Bevel:
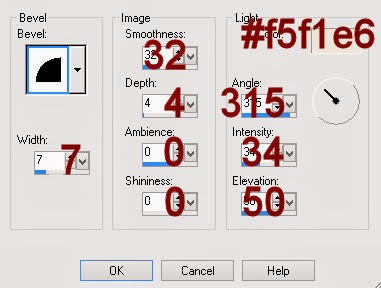
Arrange the letters however you like - Tip: Move the resized letters behind the larger letters.
Once all the letters are in position then merge visible all the letters of your name.

Copy and paste EL 73 as a new layer.
Resize as you like and place on your name.

I hope you enjoyed this tutorial as much as I did creating it for you.
I'd really love to see your results.
Email me!

Hugs,
Bev


Wednesday, January 22, 2014

Birds, Bees, & Tweets in the Trees


Supplies Needed  

1 tube of choice – I used the wonderful artwork of Joanna Bromley which can be purchased from PSP Tube Stop.  You must have a license to use. 

Font of choice – I used Pineapples Don't Have Sleeves here

Weescotlass Mask 208 here

Dangerously Delicious Christmas template 6 - Spirits here
It can be found under Tuesday, December 3, 2013.

Plug Ins used:
Brush Strokes - Crosshatch
Eyecandy 4000 - Glow

"Birds, Bees, & Tweets in the Trees" is a tagger size scrap kit created by Sandra of S.G. Rowe Designs and can be purchased here.  You can visit her blog here.

~♥~ Let’s get started ~♥~

Open up the template.
Shift + D.
Close out the original.
Delete the top 12 layers.

Highlight Large Brown Square layer.
Click on it with your Magic Wand.
New Raster layer.
Copy and paste Paper 11 Into Selection.
Deselect.
Delete the template layer.

Highlight Red Circle layer.
Click on it with your Magic Wand.
New Raster layer.
Copy and paste Paper 5 Into Selection.
Deselect.
Delete the template layer.

Highlight Circle of Dots layer.
Click anywhere outside of it with your Magic Wand.
Selections/Invert
New Raster layer.
Copy and paste Paper 1 Into Selection.
Deselect.
Delete the template layer.

Highlight Green Circle layer.
Click on it with your Magic Wand.
New Raster layer.
Paste Paper 1 Into Selection.
Deselect.
Delete the template layer.

Color Pallet:
Foreground: #ffffff
Background: #5fab5d

Highlight Dotted Circle layer.
Make your Color Replacer Tool active.
Zoom in and double right click on the dotted circles.
The dots should turn green.

Repeat the above step with Dotted Square layer.

Color Pallet:
Foreground: ##a22222
Background: #5fab5d

Highlight Left Red Rectangle layer.
Using your Color Replacer Tool again, double right click on the template layer.

Repeat the above step with Right Red Rectangle layer.

Highlight Left Light Green Rectangle layer.
Click on it with your Magic Wand.
New Raster layer.
Paste Paper 7 Into Selection.
Apply Brush Strokes - Crosshatch:
Stroke length: 29
Sharpness: 6
Strength: 2
OK
Deselect.
Delete the template layer.

Repeat the above step with Right Light Green Strip.

Highlight Green Rectangle layer.
Click on it with your Magic Wand.
New Raster layer.
Paste Paper 10 Into Selection.
Deselect.
Delete the template layer.

Color Pallet:
Change the foreground to #ffffff

Highlight White Square layer.
Make your Color Replacer Tool active.
Double right click on the square.
Adjust/Add Remove Noise/Add Noise:
Uniform and Monochrome checked
Noise: 38%
OK

Highlight Red Square layer.
Click on it with your Magic Wand.
New Raster layer.
Copy and paste Paper 2 Into Selection.
Deselect.
Delete the template layer.

Highlight Brown Square layer.
Click on it with your Magic Wand.
New Raster layer.
Copy and paste Paper 1 Into Selection.
Deselect.
Delete the template layer.

Copy and paste your tube as a new layer.
See my tag for reference.

Copy and paste Bow 03 as a new layer.
Resize 30%
Use your Target Tool to change the color to the background color in your color pallet.

Add your elements.  I used:
Fence 01:  Resize 40%
Hot Air Balloon 01:  Resize 15%/Free rotate Right 10 degrees
Swing 01:  Resize 35%
Frog 01:  Resize 15%/Free rotate Left 7 degrees
Flower 01:  Resize 55%/Duplicate
Bird 01:  Resize 15%
Butterfly 01:  Resize 10%/Free rotate Right 20 

Degrees/Duplicate/Mirror/Duplicate/Resize 70%

Highlight your white background.
New Raster layer.
Select All
Copy and paste Paper 8 Into Selection.
Deselect.
Apply the mask.
Resize 110%
Merge Group.

Add your copyrights.

Add your name:

Color Pallet:  
Foreground & Background: #132779
Close out the background color for now.
Make your Ellipse Tool active and set the Mode to Draw Circle.
Create a circle that's a little bigger than the dark blue circle paper layer -
Objects/Align/Center in Canvas - 
Resize the circle as needed.

Make your text tool active and set the stroke to 0.8
Run your mouse along the center top of the circle.  When you see a Rocking A click your mouse.
A Text box will open up.
Type your name and hit the space bar 2x's.
Highlight the 2 spaces and your name.
Copy.
Be sure your courser is sitting at the end of the 2 spaces.
Press Ctrl + V - your name will appear again in the text box.
Keep pressing Ctrl + V until you have your name going around the entire circle.
Click on the + sign in your layers pallet.
Click on the eye of the New Ellipse layer to close it out.
Highlight Vector 1 layer and right click your mouse.
Choose Convert to Raster layer.
Apply Eyecandy 4000 - Gradient Glow:

Basic Tab:
Glow Width: 3.00
Soft Corners: 25
Overall Opacity: 100
Check "Draw Only OUtside Selection"

Color Tab:
Click on the color box and change the color to #79b785
OK

Save your tag.

I’d love to see your results.
Email me!
Hugs,
Bev